How-to topics :
how to "date" a calculator
how to clean a calculator
how to repair a calculator
how to open/disassemble a calculator
how to store a calculator |
|
How to "date" a calculator.
|
| One of the characteristics that I find important in a collection, is to be able to date the objects
what one has acquired. It is for that that I make my possible to find the manufacture date from the models I
find. If for some models or brands it's quiet easy (thanks TI) : the date it's clearly written, for others
it's harder or impossible. |
| I give here some advices which will permit you to date your invaluable machines.
These advices are mostly of general nature and cannot being applied in all cases. |
- Generalities :
Sometime a calculator can be found with the buy receipt or the guarantee certificate. That's a good
beginning. A good collector is well advised when he holds these 'precious' documents. Old ads or paper
articles are also a good way to find the calculator age.
But what to do when we only have the calculator and nothing else ? |
- The easiest is when it's written directly on the calculator :
Many from the Texas Instruments calculators have their build date engraved at the back side. The used
form is xxx WWYY or WWYY xxx, where xxx is the factory code (RCI for Italy for example), WW is
the week number and YY the year. But some TI doesn't even have this famous code. No chance, we have to
proceed in another way...
TI is not the only manufacturer to having engraved the building date in a so clearly way. |
- The serial number can contain the date :
It is the case for the HP's with a serial number in the YYWWx12345 form. x = country code,
YY = year-60, WW = fiscal week and 12345 is a 'serial' number. |
| On many Casio's, either the model has a real serial number, or it has a batch number. The serial number
is in the Yxxxxxxxxx and the batch number in the Yx123 form. in both cases Y = year last digit, and
x = month code. With a little practice, one manages to find the complete year : seventies models are
different to the eighties models, and so on ... |
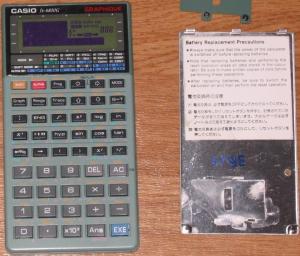
Here an example of a Casio fx-6800G going back to 1994. The batch
number (in blue on the internal face from the calculator's back) begins with a 4.
At Casio it became a generality, on the scientist models which it is necessary to open to
replace the batteries : the batch number is printed in the internal side from the back panel. |
| Sharp has also adopted this kind of serial numbering but less general, and the more recent the models are,
the less there is a chance to find a serial number. |
| In the future I will try to supplement this paragraph by adding the way of finding the building year
in the serial number from other manufacturer. |
| - If the serial number does not contain the date or is absent,
It becomes necessary to open the calculator. For that, please refer to the
"How to open/disassemble a calculator" paragraph. |
The more the calculator is old the more it is easy to date it. You only need to decode the
"microprocessor's" dates code printed on it. Indeed in order to identify them, practically
all microprocessors have a code. The manufacture date is a part from this reference. You can compare
the microprocessor id with that which you will possibly find in the database ...
On US or European microprocessors (or other electronic components) manufacturers, the date is
generally in YYWW (Year-Week) form. But for Japanese manufacturers, the date is rather in the
form YMxxxx (Year-Month code). |
| Here a series of pictures giving several cases. |
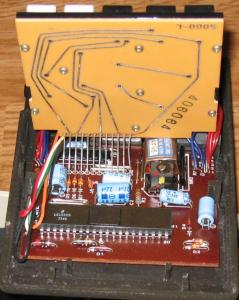
BrainMate 800M from 1973 with a Signetics LC1552B microprocessor: date 1973 as in 7345 (week 45). |
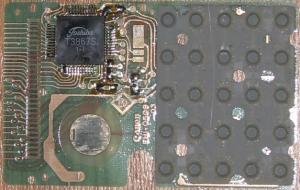
Canon LC-62 from 1981 with a Toshiba T3867S microprocessor: date 1981 as in 1-I. |
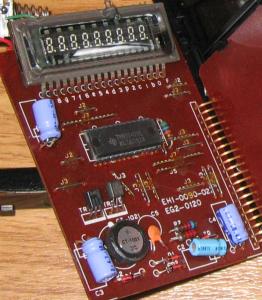
Canon LD8M 3 from 1979 with a Texas Instruments TMS1042NL microprocessor: date 1979 as in 7923 (week 23). |
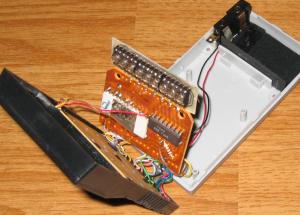
NS 810 de 1973 has a not readable microprocessor code, but the display driver is an ITT 7105 : date 1973 as in 7342. |
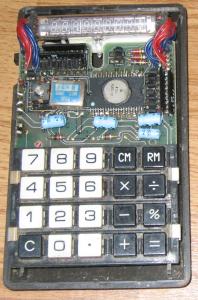
Royal Litton RC 85MK from 1974 with a Rockwell A4130PA microprocessor : date 1974 as in 7418. |
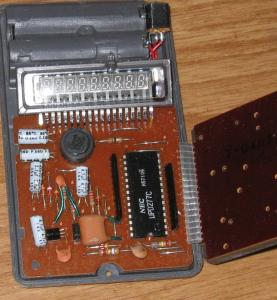
Sanyo CX-8136N from 1975 with a Nec μPD277C microprocessor : date 1975 as in H57109. |
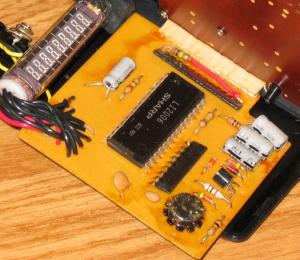
SVM 105 from 1976 with a Sharp LI2006 microprocessor : date 1976 as in 6C2 001. |
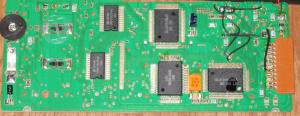
Sharp PC-1401 from 1983, the date on the chips corroborate the serial number date ... |
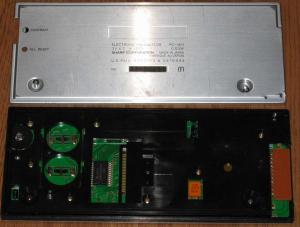
... which begins with a 3. |
|
Others examples here. |
| That's not finished yet, there is more to say ... |
|
|
How to clean a calculator.
|
There are generally two kinds of cleaning to make on a calculator :
If the batteries have leaked the inside must be cleaned. Sometimes to clean the batteries pack isn't
enough, for that the calculator must be opened. Plastic parts (such as the case, without
electronic) can be cleaned directly in water and then dried up with a clean cloth. For PCBs it's better to
use a wet cloth or kitchen paper and then another dry.
For dust or grease one can use (with parsimony) methylated spirits. Use the spirits only with a cloth or
kitchen paper. Other cleaning products can be used as computer display or glasses cleaner. It's better
to use kitchen paper, glass cloth or thin cotton cloth.
Ultrasonic bath cleaner have to be avoided, they are too effective, they even erases printed labels ! |
| That's not finished yet, there is more to say ... |
|
|
How to repair a calculator.
|
| There are generally two kinds of repair to do : |
- Case repair
Generally to repair a calculator case, practical-mind and glue are enough. Always take
care to make repairs as less visible as possible, if not it is not worth to repair...
To clean the surfaces well to stick and use, with parsimony, models builder's glue contributes
largely to the success of repair. |
- Electronic repair
You just bought an old pretty calculator, you put in new batteries but it does lights up...
Sometimes while insisting a little on the power switch you can remove oxidation that can be on the
switch contacts, and the calculators turns on. Same thing for the batteries, it is necessary
to clean the contacts.
That still not enough...
In much of the old models, the batteries are soldered within the calculator. In this case it is
better to unsolder them (would be this only to store the calculator thereafter),
because there are strong chances that these batteries are out of use.
After opening, if you notice that the PCB has a split or is broken, you have
to go to the serious thing : use a soldering iron. Same for one or more PCB wire witch would have
been dissolved by the leaking battery acid. In this case, and as from the moment when you feel to
belong to the Knights of the Soldering Iron Brotherhood, you should not hesitate to save the
calculator by replacing the broken or missing PCB wires. |
| Now that you have fixed all broken wires, this calculator always won't to wake-up to life. It's
probably a dead electronic component... In this case only the recourse to a standard exchange of defective electronic
component from an identical model of calculator is possible. It is very hard to find new spare parts ...
Here another practical-minded advice, is it really worth to "steel" electronic components from a bad
looking but fully functional calculator ? Is it not better to try to find the same model in a correct shape AND
functional state ? It's up to you to judge. |
Some repair examples : from a HP-19C, from a HP-41CX or its card reader, from a HP-49G+, from a HP-67 or another HP-67, from a HP-97 or from a HP Woodstock type.
Another example from a Casio fx-120.
|
| That's not finished yet, there is more to say ... |
|
|
How to open/disassemble a calculator. |
| On much of old computers, not of problem, there are screws, sometimes hidden often not.
But on others one needs a little more tact to open them, therefore if you do not smell yourselves
any able, it be better not to try to open them. I thus benefit from it to recall that I to reject any
responsibility for any damage which you will be able to cause at the time of the opening of a computer. |
On certain old HP, the series Classic (35, 45...) for instance, two of the screws are
hidden under the back label . In this case it is to better avoid trying to open the calculator : it would make it lose much value.
This kind of machines are to be opened only if the batteries have much leaked inside the calculator.
For the other HP and for the same kind of reason, it is to better avoid dismounting the following
models: the Scipe/Spike family (33, 34...), the Voyager family (11C, 15C ...), the 41, 71 and 75, although all these models use cases closed with screws. Only the Woodstock
(21, 25...), Sting (10 & 19C) or Topcat (91, 97...) families can be open without having to harm a label
nor a gummy foot.
For all other recent HP models, the case is closed by thermo-sealing technic, only some specialists
went so far as to open them. |
| To my knowledge, rare are the calculators whose case is closed by screws and which one or more
of these screws are hidden under a label or a self-adhesive gum. Thus, if you feel able, do not hesitate
to throw an eye inside the calculator. In all cases, think of using the suitable screwdriver (especially
with Philips screws). With a too large or too small screwdriver you would quickly deteriorate a hard to
open screw, and those are easy to find on ooold calculators ... especially when the batteries have leaked. |
| The other manner of closing a calculator case is to do it without any screw at all. There are
plastic pins which maintain the two case parts together. some manufacturers put excavations in the
plastic to slip a flat screwdriver there and thus to ease the opening. This facilitates work,
but it is still necessary to take care to use a rather broad and not too thick screwdriver.
Use a too fine screwdriver will damage the case. Some calculators open rather well by using finger
nails or hard plastic spatulas in the place of a screwdriver, I recommend of course this softer method. |
| Unfortunately one very often finds calculators which were already opened with more or less of care.
These machines are in general easier to open, if you are 'rookie' in the calculators opening matter,
it is better to start with these machines. But it is not a reason to deteriorate them more than they
already are : go ahead with tact. |
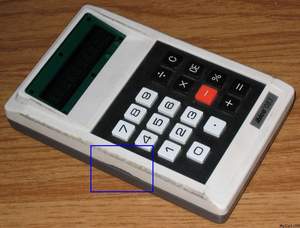
One pays attention, with much smoothness but some plastic ages badly and becomes easily
breakable, it is then practically impossible to open certain calculator without deteriorating the case ...
There are for example the early Canon Palmtronic family or the Ibico's 08x which have (with various
levels) this problem.
Here an example of what can happen ! |
Some example on this link. Or over here. |
| That's not finished yet, there is more to say ... |
|
|
|
|
How to store a calculator.
|
Withdraw all kind of batteries and keep them separately if you want absolutely to keep them.
Keep the calculators out of dust and sun light, the best it's in a box. |
| And please keep them away from kids ... Little boys loves to open and disassemble such kind of
electronic devices ;-) |
| What I have just stated can sound obvious, but still should it be applied !
I found so many calculators in such a pity state... |
| It's not finished, there is so much to say ... |
|
|

